Kristin enlarged and re-arranged the Eclipse templates so that they are printable on "Letter" (8 1/2 by 11 inches in the US) paper--one template per page--and ready to use.
Thanks, Kristin!
You can download them using these links:
Template A
Template B
Template C
As Julie pointed out, these templates are used in the Eclipse quilt pattern to make larger blocks, but, because of how you use them, you can use the same templates and start with a smaller square. The arcs (which become circles when four blocks are sewn together will be the same size, but, in our 9 inch (finished size) blocks, there will be less fabric around the outside of the block than those in the Eclipse quilt pattern.
As I was making the blocks, I thought about using them with some 10" fabric squares that I have from a swap (with dog themes) to make a kids quilt. It would add some interest without completely chopping up the novelty fabrics.

Showing posts with label quilt tips. Show all posts
Showing posts with label quilt tips. Show all posts
Sunday, January 1, 2012


Tuesday, November 1, 2011
Scrappy Trips
Anyone have a tip on how to get your corners to match up. I tried cutting and sewing accurately, but every once in awhile I have a square that just will not behave.
Friday, September 2, 2011
Curved Rails Q & A
Q: So, is there a trick to getting these to lie flat? Or are we just not worrying about that?
(edited by Sophie to add)
A: Yes, you do want to worry about that--that is kind of the point of this month's block . . . but don't make yourself crazy with it. If you are having problems, here are some things to look at or think about:
(edited by Sophie to add)
A: Yes, you do want to worry about that--that is kind of the point of this month's block . . . but don't make yourself crazy with it. If you are having problems, here are some things to look at or think about:
- Make smooth cuts with gentle curves. If you have never sewn curves, then begin with a very shallow, gentle curve ... when you get the hang of it, you can make more dramatic curves. But whether it's a big hill or a little one, you want it to be very smooth with no quick turns.
- Go slow. You're only sewing two seams for each block, so there's no need to rush.
- Press carefully. If pressing the seam one way doesn't seem to be working, try it the other way. For me, pressing toward the side on the inside of the curve worked best.
- Read what others have had to say--there are hints in between all those block photos, like this one from Michelle:
The key is to line up the start and put needle down into it and lower presser foot. Then hold top strip with your left hand and bottom strip in your right and guide each strip to keep the edges lined up as you sew.
And from me (from the directions):
I used a single pin near the middle of the seam–it allowed me to focus on just a few inches at a time and create nice smooth 1/4-inch seams.
Don’t worry if your edges don’t match perfectly because you will be squaring up and trimming the block.
And ... I'm hoping others will have some suggestions for you in the comments.
Tuesday, July 5, 2011
July blocks by strip method

Here are my ten blocks, which I made by the "strip method".

Make your three cuts in one direction, switch very other piece, and sew the strips together to make two new blocks.
Lay them over each other, right ride up, matching the seams, and cut again three times.

In sewing these together I tried to match the MIDDLE seam, and let the others fall where they wanted to.
Sara
Tips for Making the Liberated Checkerboard
A few people have shared their observations about making this block. Even though more than 100 blocks have already been made and posted, I'm guessing there will be many more to come. So . . . if you haven't yet tried the block, you may find these notes useful . . . and if you have, you may want to add some tips of your own as a comment and I'll edit this post to include everyone's suggestions.
From Linda (in Dallas):
Krista suggested that we take the same approach as in our Tic Tac Toe blocks:
probably Krista or I will work up an example and Sara blogged some of her in-progress photos here. My intuition is that the intersections will be even less likely to match ... but that's really OK.
Does anyone else have a tip to share?
From Linda (in Dallas):
- For the first pair, use 2 fabrics that have a definite wrong and right side ; a white on white print and tone on tone bright. That way if a cut piece goes walkabout a bit, it's easier to match it's shape into the liberated "grid. " (I used a solid color and a w-o-w so had a slight panic when a piece stuck to another).
- When matching seams, since seams aren't perpendicular to cut edge, you should only match pin with seams at the 1/4" spot from the edge. The pin won't match the seams further into the piece, and you'll distort the fabric if you try to force a match.
Julie noted:
- The intersections of all the "squares" aren't really supposed to match up, are they? Seems like if you're cutting the blocks wonky, there's no way for them to match when you sew them back together... at least mine don't!
Krista suggested that we take the same approach as in our Tic Tac Toe blocks:
- make 3 vertical cuts
- swap 2nd & 4th strips between blocks, and sew together to make two striped blocks.
- Press the two blocks in opposite directions
- make 3 horizontal cuts
- swap the 2nd and fourth rows from one block to the other
- stitch and press
Does anyone else have a tip to share?
Saturday, January 29, 2011
Thread help
I am pretty new to quilting. And I'm wondering what thread everyone uses for piecing. What I know I learned from my grandmother and she only uses cotton thread. So I've only used cotton. However, I've had a hard time finding the big cone spools of cotton thread in any of the stores near me. So I wondered if everyone just uses polyester or if you all just buy little spools. I've found some options for buying cotton thread online, but the price range is pretty big. So if you use cotton thread only what brand do you buy? Thanks for any insight you can offer! - Andrew
Thursday, December 2, 2010
Newbie Question
Hi everyone! I'm new at this Block Lotto goodness - does fabric need to be pre-washed?
Monday, August 2, 2010
Two More (Blue) Roses and Tips on Adding Green Background
I know I said I'd make more blocks–in some other color besides blue. But these fabrics were out and calling to me this afternoon.

As I was making them, I realized that in my directions for making the block, I say something like, "add green fabrics to make the block square," which is right up there with "quilt as desired" with being next to useless So here are some notes (and photos taken today) that explain how I approach that last step.
One of the things I love best about quilting is that there are so many ways to do any given thing. You may not "see" the block the way I have and you might not be as anal about creating straight grain edges to your block (and that's OK), but I thought I'd share how I'm doing it. (And I'll update my directions with this addition info later).
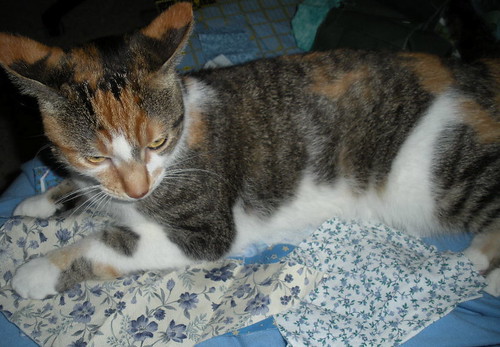
There is one more thing for this month. If you win AND you are allergic to cats, please be sure to let me know. One of my cats, Grace Hopper INSISTED on "helping" with the fabric selection for these blocks. As you can see from her expression and the position of her ears, she was adamant about it and wasn't going to budge without a fight . . . so I caved and let her "help".
As I was making them, I realized that in my directions for making the block, I say something like, "add green fabrics to make the block square," which is right up there with "quilt as desired" with being next to useless So here are some notes (and photos taken today) that explain how I approach that last step.
- When you have added enough logs (aka petals) and the rose because a good size, then figure out what orientation it will have in the final block. Personally, I try to avoid having any long edges along an edge, because it starts to turn into a "house" in my mind. Begin by adding green background to the open spaces to complete one side and the corners on each end.
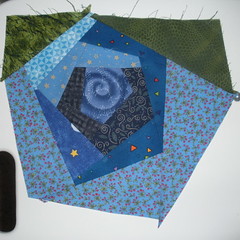
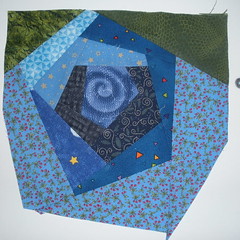
- Trim that side and both corners to size–9.5 inches square. At this point, you will be able to know for sure if any part of your rose will be chopped off in the finished block–you can go ahead and trim them off now. You'll also be able to see the shape of the open spaces to be filled with green (leaf) background. Notice how the point on the right side of my rose in the photo on the left has been trimmed to fit in the right photo.
- The blocks will be easier to work with if you make some effort to end up with straight grain along the outside edges, so if you have a triangular space to fill, use a similarly shaped fabric, with the bias on the inside and the straight of grain on the outside edges. I added a triangle shape to the third corner and when it was trimmed, the outside edges were on-grain.
- To cut a piece of fabric to fit the shape, lay the background fabric on the cutting mat so that the straight edge is where you want the side of the block to be, then lay the rose-in-progress over it. Slide them apart a 1/2 inch (or a little more) to account for the bite the seam allowance will take from both the rose and the background, then cut the background even with the edge of the rose.
- Continue to add background and trim after each seam to ensure that there are no surprised and your block will end up being correctly sized.

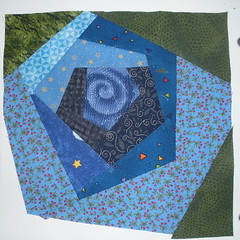
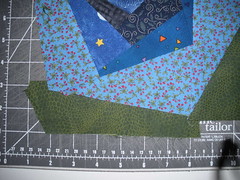
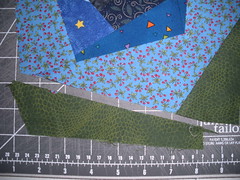
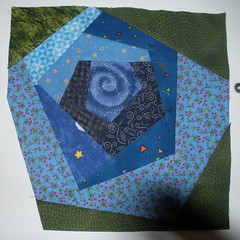
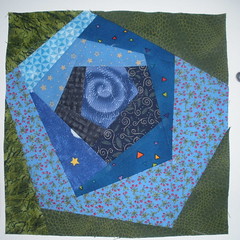
One of the things I love best about quilting is that there are so many ways to do any given thing. You may not "see" the block the way I have and you might not be as anal about creating straight grain edges to your block (and that's OK), but I thought I'd share how I'm doing it. (And I'll update my directions with this addition info later).
There is one more thing for this month. If you win AND you are allergic to cats, please be sure to let me know. One of my cats, Grace Hopper INSISTED on "helping" with the fabric selection for these blocks. As you can see from her expression and the position of her ears, she was adamant about it and wasn't going to budge without a fight . . . so I caved and let her "help".
Friday, July 30, 2010
Because someone asked ...
. . . and I figure others may be wondering.
YES, it is perfectly OK to add background fabric to a too-small block to bring it up to size. Part of the liberated quilting approach is chopping off anything that is too big and, if something is is too small, ADD ON. I had fully intended to make some blocks intentionally small as examples, but because of my move (and my LIFE), I haven't been able to make blocks for this month . . .YET. (I still have 24 hours and I am perhaps foolishly optimistic ;-)
Here's the Block Pattern info, from the July 1 blog post, with new emphasis added on the relative sentence:
YES, it is perfectly OK to add background fabric to a too-small block to bring it up to size. Part of the liberated quilting approach is chopping off anything that is too big and, if something is is too small, ADD ON. I had fully intended to make some blocks intentionally small as examples, but because of my move (and my LIFE), I haven't been able to make blocks for this month . . .YET. (I still have 24 hours and I am perhaps foolishly optimistic ;-)
Here's the Block Pattern info, from the July 1 blog post, with new emphasis added on the relative sentence:
BLOCK PATTERN INFO
For instructions for making this block, download Asterisks from Tonya Ricucci's tutorial page on her UnRuly Quilter website.
We are making larger blocks than Tonya's: 8-1/2 inches square to finish at 8 inches in the winners' quilts. I suggest beginning with a 10 square of background fabric to give you some wiggle room to trim and square up; and cutting the strips 1-to-2 inches wide. If your block comes out a little too small, don't fret, just trim it to 7-1/2 inches or less (in one or both directions) and add a strip of background fabric to bring it up to size.
As usual, you may make up to a maximum of NINE BLOCKS this month.
Sunday, July 11, 2010
re Tic TacToe
I haven't figured out how to add a comment so am sending it this way. Your Tic Tac Toe top is delightful. I like the dark backgrounds with white crosses sprinkled around in the quilt.
To help with some of your questions, I would suggest that you quilt it then bind it. If you plan to quilt in the sashing, you might like to try using a serpentine stitch if your machine has one. A quilter friend used it instead of a straight stitch and if you are trying to stitch along a seam ( in the ditch) it hides a multiple of "oops" I went off the line. It looks nice too. If you think that it needs more quilting after doing the sashing you might tie it in the blocks. That would certainly be secure enough to withstand lots of washing.
I took a machine quilting class recently and the instructor suggested pinning the quilt layers well, press the backing and top well. Then to layer them tape them down on the edges to hold them taut then pin approximately 4" apart in the centre of the quilt and closer around the outside edges. A walking foot on the machine will help to feed the top layer and prevent bunching up pleats where you stitch over lines. It probably won't be needed if you don't use batting. Some machines have the walking foot built in. Remove the pins after you have quilted to make the whole thing lighter to handle. A hint I learned to help support the quilt, move your ironing board next to you and the sewing table and adjust it to the height of your table. It gives you more surface area beside you to hold the quilt as you are quilting. Practice on a few small pieces to get the hang of it and take your time. Don't forget to breath - we tend to hold our breath as we are trying to machine quilt - the instructor was right about that, I learned that from experience too. Happy quilting!
Cory
To help with some of your questions, I would suggest that you quilt it then bind it. If you plan to quilt in the sashing, you might like to try using a serpentine stitch if your machine has one. A quilter friend used it instead of a straight stitch and if you are trying to stitch along a seam ( in the ditch) it hides a multiple of "oops" I went off the line. It looks nice too. If you think that it needs more quilting after doing the sashing you might tie it in the blocks. That would certainly be secure enough to withstand lots of washing.
I took a machine quilting class recently and the instructor suggested pinning the quilt layers well, press the backing and top well. Then to layer them tape them down on the edges to hold them taut then pin approximately 4" apart in the centre of the quilt and closer around the outside edges. A walking foot on the machine will help to feed the top layer and prevent bunching up pleats where you stitch over lines. It probably won't be needed if you don't use batting. Some machines have the walking foot built in. Remove the pins after you have quilted to make the whole thing lighter to handle. A hint I learned to help support the quilt, move your ironing board next to you and the sewing table and adjust it to the height of your table. It gives you more surface area beside you to hold the quilt as you are quilting. Practice on a few small pieces to get the hang of it and take your time. Don't forget to breath - we tend to hold our breath as we are trying to machine quilt - the instructor was right about that, I learned that from experience too. Happy quilting!
Cory
Saturday, June 5, 2010
A Closer Look at Making the Basket Handle
As promised here's a closer look at those bias handles with some additional suggestions for creating curved bias appliqué. This approach will work whether you are making basket handles, stems, vines, branches, etc.
When it comes to quilting, we are taught to avoid working with bias edges, using STEAM when pressing and pulling/contorting our fabrics. But sometimes, all of these things can work for you to achieve the desired effect.
Here's a closer look at the steps for making the basket handle. Click any of the photos for a larger image and add your own tips in the comments.
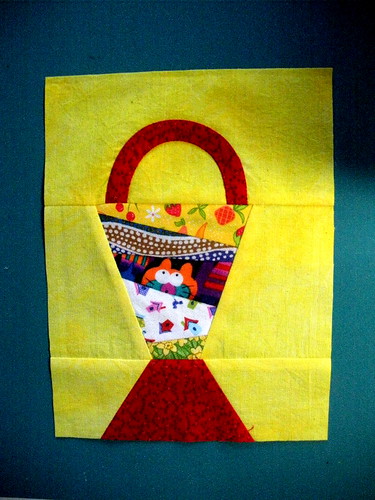
When it comes to quilting, we are taught to avoid working with bias edges, using STEAM when pressing and pulling/contorting our fabrics. But sometimes, all of these things can work for you to achieve the desired effect.
Here's a closer look at the steps for making the basket handle. Click any of the photos for a larger image and add your own tips in the comments.
- Be sure to cut your 1 1/2 inch strips ON THE BIAS. Align the 45 degree line on your ruler with the selvedge or cut edge of your fabric to find the bias line across your fabric.
- Sew the bias strip into a tube by sewing the two long edges together, WRONG SIDES together. Don't even finger press the fold and you won't have to worry about getting rid the crease you create. Thread color doesn't matter (notice my not so "neutral" light gray.) After you've sewn the seam, trim away the seam allowance as close as you can to the seam–after the bias is in place, there will be no stress on that seam.
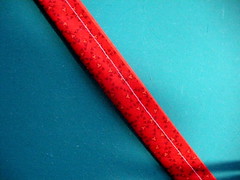
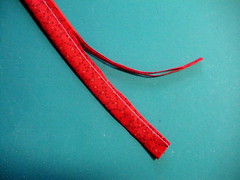
- Now, carefully prepare the sewn bias strip. Roll the seam and it's tiny seam allowance between your fingers so that the seam is in the middle of the strip. Take the strip to the iron and press it firmly so that it is VERY flat.
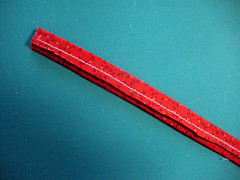
- Next, using the STEAM in your iron, "swirl" the strip. This is a technique I learned when making hats. It's how you create the shape of the grosgrain ribbon that rests against the head inside the hat. Since your head isn't a cylinder, the ribbon needs to wider at the bottom than the top, by swirling the ribbon into a slight curve, you create a ribbon that measures longer on one side than the other and fits beautifully inside a hat and against the head.
The technique works like this: using a STEAM iron in one hand to anchor one end of the strip to the ironing board and holding the other end of the strip in your other hand to manipulate the strip. As you press along the length of the bias strip, you'll be stretching one edge slightly to create a curved shape.
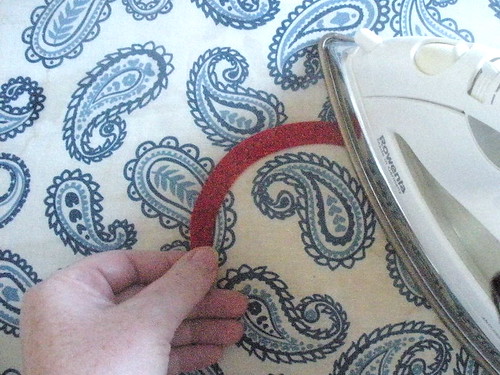
Depending on the angle at which you pull the strip around, you could come very close to creating the shape you want for your handle at the ironing board. I was able to completely form my handle at the ironing board.
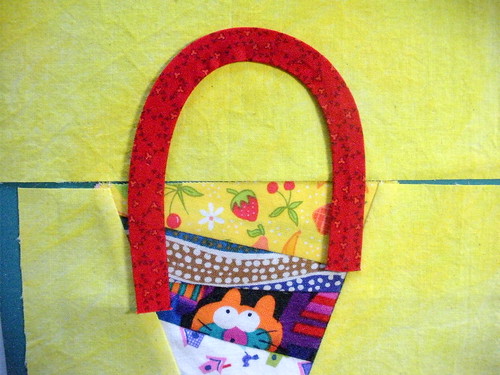
- Pin the handle in place, focusing on the OUTSIDE of the handle first. Use as many or few pins as you need. If you are stitching your handle down on the machine, be sure to remove the pins as you come upon them.
- When machine stitching the handle, be sure to use a thread color that matches or invisible thread. Use an open sewing machine foot that will allow an open view of the needle/seam and the edge of the handle. If you can change the needle position on your machine, take advantage of that feature to sew as close to the edge of the handle as you can. On my little Bernina, I used a #10 appliqué foot and moved my needle 1 step away from the far right right position (4.5 out of 5 on my scale).
If you are using a straight stitch, as I did here, you want to be close to the edge while staying on the bias strip If you are using a blind stitch, blanket stitch or zigzag, you'll also want to be close to the edge, but stitching along the background (and zigging into the handle).
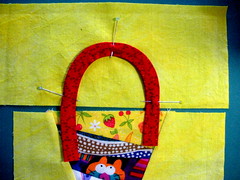
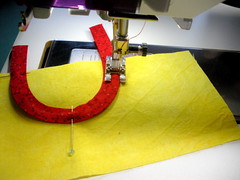
- After you have stitched down the outside, you may notice that the background has pulled in a little. You also now have an opportunity to work on the inside curve with the STEAM iron. so, press the strip again, with STEAM, starting with the curviest part of the handle works the excess fabric into the straighter/more gently curved areas so it doesn't get tucks in it. Pulling the edge down/pressing towards the bottom of the block rather than perpendicular to the stitching on the outer edge shortens the fabric in the inside curve to help it lay smoothly as well.
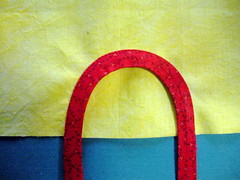
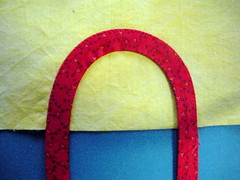
- When you have pressed and manipulated the handle so that it lies flat, you're ready to stitch down the inside curve. Once again, you want to sew as close to the edge as you can. Upon close examination, your stitching will highlight the beautiful, smooth curve (with all edges appearing to be turned under– something I learned to think about in a Jane Sassaman workshop from some years ago.
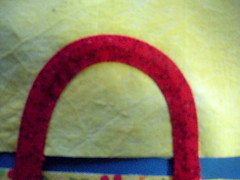
Once your handle is completed, attach it to the bottom of the basket block, trimming the excess length of handle even with the fabric edge. I generally sew first and trim later to ensure that the ends of the strips don't have any possibility of folding up and getting in the way in the seam and . . . not lying flat when I'm done.
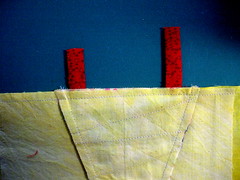
Saturday, May 1, 2010
Tips and Troubleshooting for the May Block
Here are my tips for making the Reeds blocks. If you have made the block and have tips for solving any of the problems you encountered, please add them in the comments.
Thread color matters this month, especially for white and black backgrounds. If you use a contrasting thread, it is mostly likely to show on the seams where you insert the background bias into the background.
Be sure to cut the bias as true bias on a 45 degree angle (align the 45 line on your rotary ruler with the selvedge edge or cross grain), so that you'll have as much stretch as you need.
Always sew the curved seams with the bias strip on top, so you can easily manipulate it. I slightly stretched the bias on outside curve edge and eased it a little on inside curve.
I stitched all of my blocks WITHOUT pins, concentrating on the inch or two in front of the needle as I sewed.

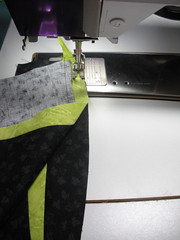
If you are having problems inserting the bias "reeds," then trim them narrower.
If you are using too-thin fabric, you may have problems pressing the block and will end up with lots of puckering when you use steam . . . ask me how I know ;-)
Press the seams in whichever direction will result in a flat, uncrinkled block. The first thing to try if you are having problems pressing the seam is to try pressing the seam in the other direction.
Thread color matters this month, especially for white and black backgrounds. If you use a contrasting thread, it is mostly likely to show on the seams where you insert the background bias into the background.
Be sure to cut the bias as true bias on a 45 degree angle (align the 45 line on your rotary ruler with the selvedge edge or cross grain), so that you'll have as much stretch as you need.
Always sew the curved seams with the bias strip on top, so you can easily manipulate it. I slightly stretched the bias on outside curve edge and eased it a little on inside curve.
I stitched all of my blocks WITHOUT pins, concentrating on the inch or two in front of the needle as I sewed.
If you are having problems inserting the bias "reeds," then trim them narrower.
If you are using too-thin fabric, you may have problems pressing the block and will end up with lots of puckering when you use steam . . . ask me how I know ;-)
Press the seams in whichever direction will result in a flat, uncrinkled block. The first thing to try if you are having problems pressing the seam is to try pressing the seam in the other direction.
Wednesday, February 3, 2010
binding from the back
I have done many quilts with the binding from the back.
http://www.how-to-quilt.com/articles/9002-self-binding.shtml
http://quilting.suite101.com/article.cfm/binding_your_quilt
Here are some sites that have info on how to do it.
http://www.how-to-quilt.com/articles/9002-self-binding.shtml
http://quilting.suite101.com/article.cfm/binding_your_quilt
Here are some sites that have info on how to do it.
Tuesday, October 13, 2009
Getting This Block Right
 Because, this month, all of our blocks need to fit together, almost like a tesselating pattern, it's important that we all get the blue and yellow stars in the same location . . . and the black and white 4-patches all oriented correctly.
Being more than a little dyslexic myself, I thought I'd share my way of looking at the block.
Maybe it will help others or maybe it's just my own unique way of seeing this block . . . either way, here are my tips for "getting this block right, " every time.
 1. I think of the block as a friendship star (with a 9-patch construction) in the upper left with a pieced sashing strip on the right side and bottom.
2. The friendship star is a blue star on a yellow background.
3. The black and white 4-patches are placed in the corners such that if you connected the dark squares, you would be drawing a circle around the blue friendship star.
 4. When you add the pieces to the right side and bottom, you are creating partial friendship stars that are yellow stars on a blue background.
Yes, I am finally upright, though I am still coughing up stuff and feeling lousy . . . I cut some fabrics for blocks yesterday and managed to make this one today. I will try to get some formal directions on-line soon and update the side-bar etc. As I told someone in email, I feel bad that my icky case of the flu is hurting the block lotto this month because these blocks will make a great scrappy quilt for some winner . . . if we can manage to make enough of them ;-)
Sunday, June 15, 2008
Let's Sew a Basket Block
After some forum discussion of hair pulling and suggestions of the need for cocktails, I thought I'd take a step back and approach making this month's block a little more slowly.
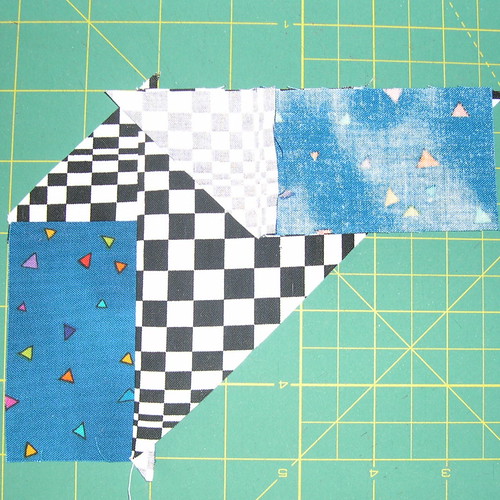
The concern seems to start here, with step one, where we sew the small triangle basket bases to the side rectangles.
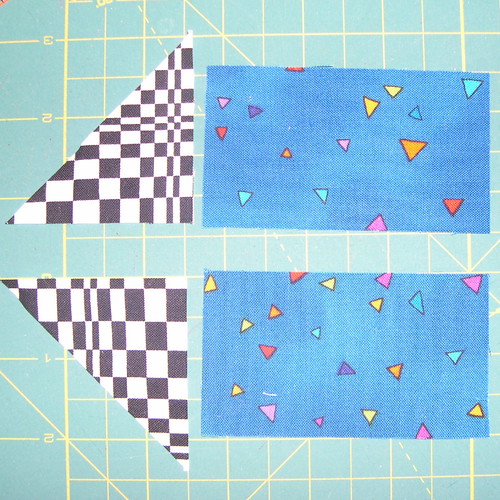
The rectangles are 2 inches wide; the triangles are cut from 2-3/8 inch squares cut diagonally. Can that be right? How can they match? Yes. The quilt match that you need to remember is that while you add 1/2 inch to the finished size of a square or rectangle for seam allowances, you add 7/8 inch to a half-square triangle or 3/8 inch MORE.
So, you put these pieces together like this before you sew.
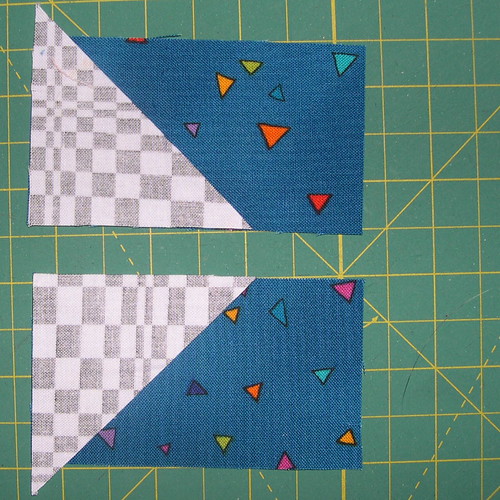
As you are sewing along, you'll notice that your seam begins or ends at the point where the diagonal of the triangle crosses the end of the rectangle.
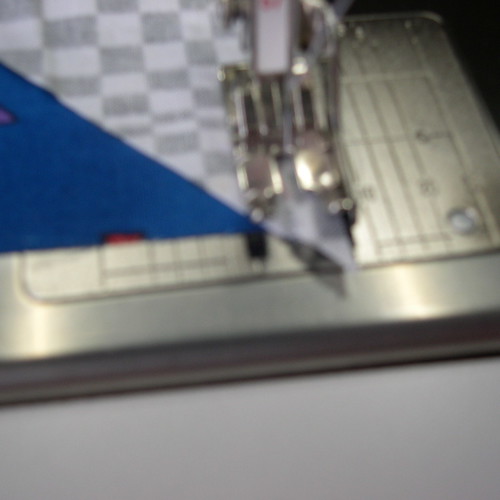
(Sorry for the less than stellar focus on this one, but hopefully you can see what I mean here).
Press the seams toward the rectangles.
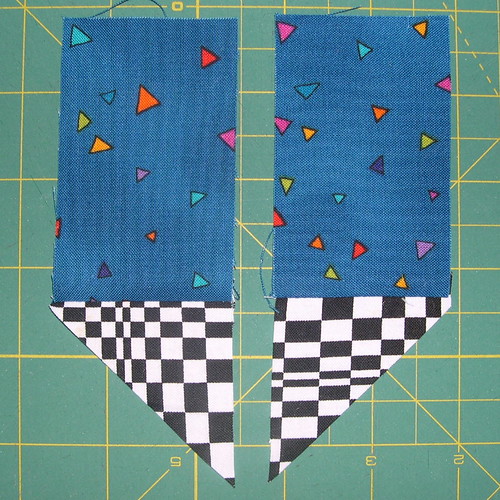
The strips fit on each side of the large basket triangles.
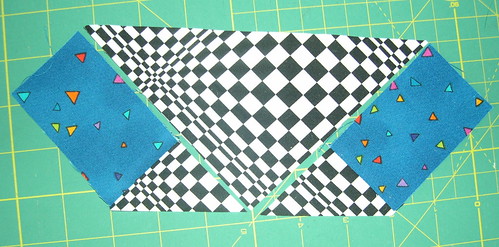
The pieces align, in a similar way, offset slightly, so that when you sew them, your 1/4 inch seams start and end at the intersections. It sounds a little tricky, but it's actually quite elegant.
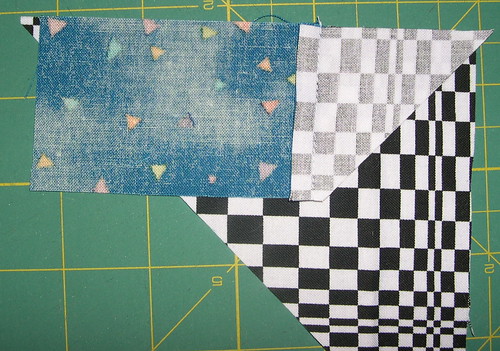
Sew one side, press toward the large basket triangle, then repeat on the other side.
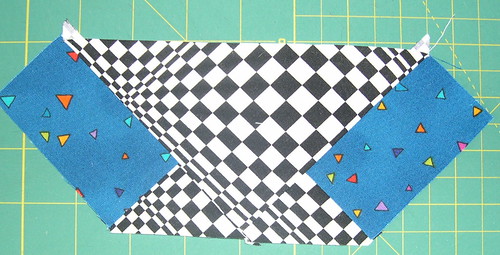
When both sides are attached, you should have a nice straight line across the bottom.
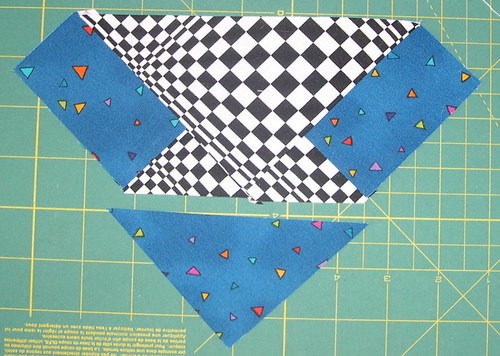
The bottom triangle will overhang slightly on each side, intersecting at the point where you sew the 1/4 inch seam. See? I'm telling you. It all fits. It's very elegant.
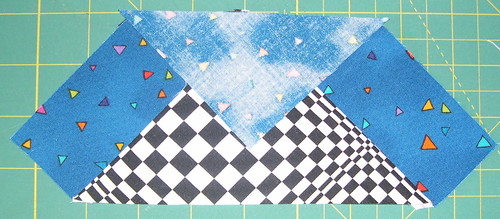
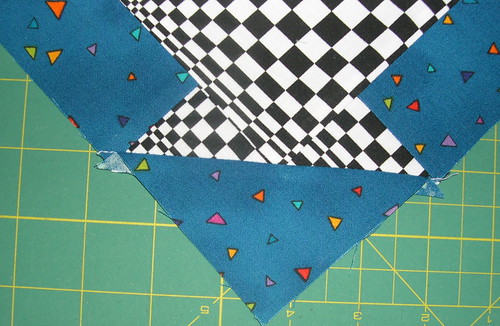
This next picture is a BAD example. You DON'T want this result. You SHOULD end up with 1/4 background extending PAST the basket base triangles--so the points won't be cut off when you sew the block into a quilt. I fixed the block afterward, but thought a bad example was worth sharing. Remember THIS is what YOU DON'T WANT.
Unless you are choosing the hand embroidery option for the handle, you must add the handle to the background triangle before you add it to the bottom of the basket.
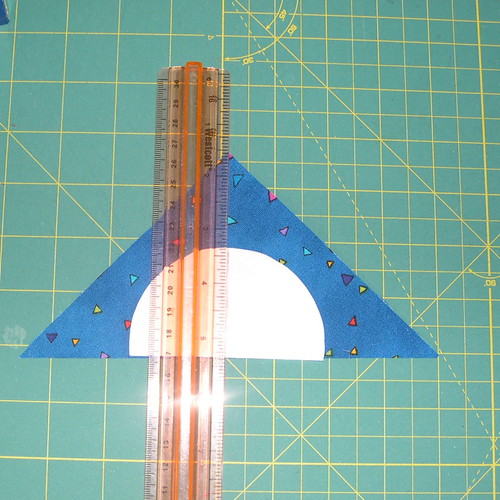
Please use the template provided in Janet's pattern--it will help make all of our basket blocks play nicely together in the winners' quilts. (If you are one of the winners, you'll really want this ;-) I used a ruler to help me make sure I was centering the template, then traced the circle onto my background fabric.
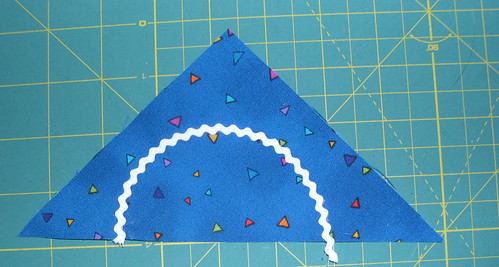
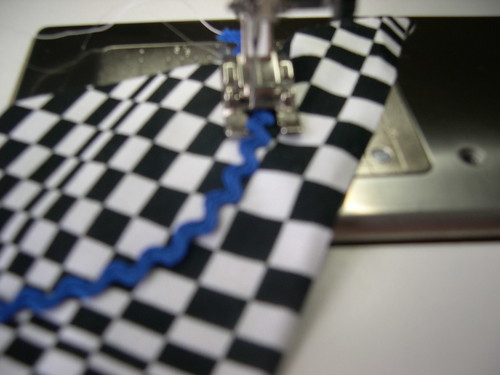
Then I used a glue stick to stick my baby rickrack in place before stitching it down. I thought it was a lot easier than pinning.
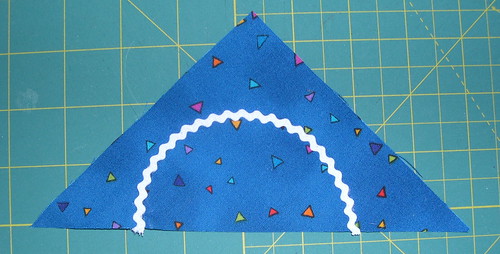
Then, after it was sewn, I trimmed the excess rickrack even with the bottom edge of the triangle.
After the handle is attached, you can complete your block.

Note, on my second block I made (with a blue basket with blue rickrack handle), I didn't have any matching thread handy, so I used mono-filament and a zig-zag stitch.
Please, don't be afraid of this block. Cut your fabrics carefully and try a pair of blocks. They are so charming and you'll feel so accomplished when you've made your blocks.
The concern seems to start here, with step one, where we sew the small triangle basket bases to the side rectangles.
The rectangles are 2 inches wide; the triangles are cut from 2-3/8 inch squares cut diagonally. Can that be right? How can they match? Yes. The quilt match that you need to remember is that while you add 1/2 inch to the finished size of a square or rectangle for seam allowances, you add 7/8 inch to a half-square triangle or 3/8 inch MORE.
So, you put these pieces together like this before you sew.
As you are sewing along, you'll notice that your seam begins or ends at the point where the diagonal of the triangle crosses the end of the rectangle.
(Sorry for the less than stellar focus on this one, but hopefully you can see what I mean here).
Press the seams toward the rectangles.
The strips fit on each side of the large basket triangles.
The pieces align, in a similar way, offset slightly, so that when you sew them, your 1/4 inch seams start and end at the intersections. It sounds a little tricky, but it's actually quite elegant.
Sew one side, press toward the large basket triangle, then repeat on the other side.
When both sides are attached, you should have a nice straight line across the bottom.
The bottom triangle will overhang slightly on each side, intersecting at the point where you sew the 1/4 inch seam. See? I'm telling you. It all fits. It's very elegant.
This next picture is a BAD example. You DON'T want this result. You SHOULD end up with 1/4 background extending PAST the basket base triangles--so the points won't be cut off when you sew the block into a quilt. I fixed the block afterward, but thought a bad example was worth sharing. Remember THIS is what YOU DON'T WANT.
Unless you are choosing the hand embroidery option for the handle, you must add the handle to the background triangle before you add it to the bottom of the basket.
Please use the template provided in Janet's pattern--it will help make all of our basket blocks play nicely together in the winners' quilts. (If you are one of the winners, you'll really want this ;-) I used a ruler to help me make sure I was centering the template, then traced the circle onto my background fabric.
Then I used a glue stick to stick my baby rickrack in place before stitching it down. I thought it was a lot easier than pinning.
Then, after it was sewn, I trimmed the excess rickrack even with the bottom edge of the triangle.
After the handle is attached, you can complete your block.
Note, on my second block I made (with a blue basket with blue rickrack handle), I didn't have any matching thread handy, so I used mono-filament and a zig-zag stitch.
Please, don't be afraid of this block. Cut your fabrics carefully and try a pair of blocks. They are so charming and you'll feel so accomplished when you've made your blocks.
Friday, February 29, 2008
Making Half-Square Triangles
You may see them called triangle squares or half-square triangles or simply abbreviated HSTs. They are found in many traditional pieced quilt blocks . . . so it's worth the effort to be comfortable with the math and the technique.
To make a pair of HSTs, you start with 2 squares of fabric, each cut 7/8 inch larger than the finished size you want. For the 6 inch Shoo-Fly blocks, the HST units in the corners finish at 2 inches, so you add 7/8 and cut your squares at 2-7/8. Some quilters round up and cut squares 1 inch larger and trim afterward. After the HST unit is complete, it should be 1/2 inch larger than the finished size (2-1/2 inch for our Shoo-Fly blocks).
Kate put together these great step-by-step photos and notes on one method for sewing perfect half-square triangle units every time.
To make a pair of HSTs, you start with 2 squares of fabric, each cut 7/8 inch larger than the finished size you want. For the 6 inch Shoo-Fly blocks, the HST units in the corners finish at 2 inches, so you add 7/8 and cut your squares at 2-7/8. Some quilters round up and cut squares 1 inch larger and trim afterward. After the HST unit is complete, it should be 1/2 inch larger than the finished size (2-1/2 inch for our Shoo-Fly blocks).
Kate put together these great step-by-step photos and notes on one method for sewing perfect half-square triangle units every time.
- First draw a diagonal line across the back of the 2-7/8 inch light (WOW) square. Then, placing the square right sides together with a dark (floral) square of the same size, stitch 1/4" away from the diagonal on each side.

- Then cut the two halves apart down the original marked line.

- Press open to yield two half-square-triangle (HST) units. For the March Shoo-Fly blocks, you'll repeat this with the other pair of 2-7/8 inch squares to make four half-square triangles (HST) units in total.

- Check to make sure your sewn units measure 2-1/2 inches. Square them up as necessary at this stage.


Subscribe to:
Posts (Atom)