
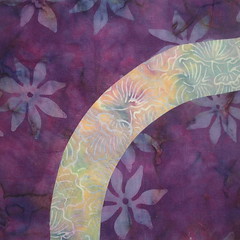
 This is a slightly modified version of a block I found on the funquilts.com site, called Eclipse which will be our January 2012 lotto block. We're changing the directions to make a smaller block (9 1/2 inches, to finish in the quilt at 9 inches).
The two challenges you may find in this block are working with templates and sewing curves.
You can download the directions for the Eclipse quilt from the free patterns at the bottom of this page: FunQuilts Patterns & Kits
You'll also be able to see their setting and just how cool these blocks will look together ;-)
IMPORTANT CHANGE FOR OUR LOTTO BLOCKS:
IN STEP 1. OF THE CUTTING DIRECTIONS, CUT THE LARGE SQUARE 9 1/2 inches (instead of 11 1/14 inches)
This is a free pattern with materials and cutting directions for making a quilt. For each block you'll need 2 squares of fabric, approximately 10"square of bright background and an 8" square of light for the arc.
NOTE: The templates on the bottom half of page 2 must be printed (or enlarged) at 200%. I took mine to a copy shop because my printer at home doesn't print on "tabloid" sized paper (11 x 17 inches in the US).
UPDATE: Kristin enlarged and re-arranged the Eclipse templates so that they are printable on "Letter" (8 1/2 by 11 inches in the US) paper--one template per page--and ready to use. You can download them using these links:
Template A
Template B
Template C
FABRICS
The colorway for January is BRIGHT + LIGHT.
The background should be bright, bold fabrics.
The arc should be a fabric with a LIGHT value. Please NO whites or creams. Your light fabric should have some color.
They may be solids, tone-on-tone prints or multicolor prints that are predominately ONE color. Please do NOT use "made" fabrics (sewn from small pieces) for the lotto block this month. Your bright + light fabrics do not have to be the same color. They can be light and dark values of the same color or interesting fabric combinations.
MULTIPLE BLOCKS
You may make a maximum of 9 blocks. If you make multiple blocks, you may use the same fabric in up to three blocks, as long as the fabric combination (bright + light) is unique in each block. So, you could make the maximum 9 blocks from as few as 3 brights plus 3 lights, combining each bright with each light for 9 unique fabric combinations.
BLOG POSTING AND LABELS
Let's wait until January 1, 2012 to post photos of our Eclipse blocks. When you post, please use these labels for your posts:
eclipse - for block photos and discussion related to the block
eclipse-sent - for posts about mailing your blocks
eclipse-received - for posts from the winners about receiving your blocks
CREATING A VIRTUAL QUILT
I will have set up a group on Flickr called Eclipse Lotto Blocks and will post directions on how to join, upload and crop photos and add them to the group sometime this weekend.
Here are my first four blocks on the design wall:

NOTES ON WORKING WITH TEMPLATES AND CURVES
While the FunQuilts directions are very good, I wanted to add a couple of notes of my own. I like templates to have a little bit more substance and there are a few ways to do that. To make really long-lasting templates, you can trace them onto template plastic. You can print or copy them onto card stock, or take the printed copy and glue it to card stock or lightweight cardboard. Cereal boxes or other package materials work pretty well. Guess who had a tamale craving and bought packaged tamales recently?

Of course, I will be using them like this:
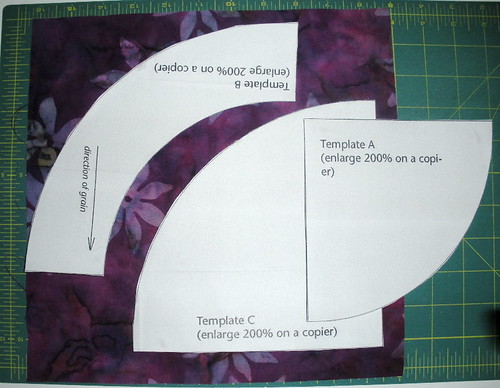
For this set of templates it doesn't matter if you use them right side up or not because they are symmetrical, but it's good to practice always using them right side up . . . because in the future you might be using templates that all need to be right side up to work together.
You might find it easier to follow along the edges of these curves (without cutting your templates) by using a rotary cutter with a smaller blade. If you have one of these, this is a good project to use them:
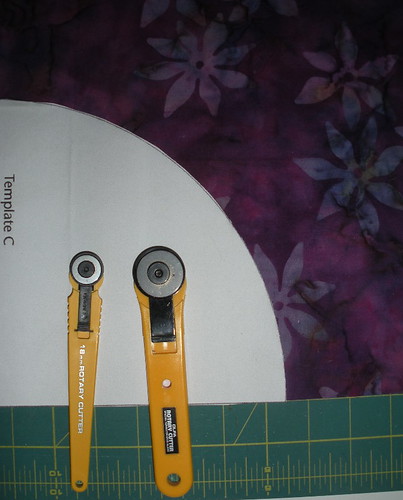
You could even use the template to draw the curved lines with a colored pencil or marking pen and CUT it with scissors ... believe it or not, quilts used to be made just like that--using cereal box templates and scissors :-)
When sewing the curves, you may find that you don't like all the pins suggested by the directions. If you cut precisely using the templates, every will match up. Personally, I carefully lined up the beginning and end and used one pin at the center of the curve and that worked for me. Your mileage may differ ...
oooh i've never sewn curves, a little intimidated but ready to give it a go!
ReplyDeleteI think this may be the FIRST pieced curve in a Lotto block that's not of the draw-your-own liberated variety. My advice is to try one block, take it slow and while you're sewing, just worry about fabric right in front of your needle--keep that smooth and aligned and sew a 1/4 inch seam and it will turn out perfect.
ReplyDeleteDarn! I'm out of ink and have no transportation.....I guess this one will have to wait.
ReplyDeleteSophie, if we enlarge the templates 200% per the original pattern directions, won't that make them the right size for an 11" block instead of a 9" block?
ReplyDeleteYes, but they will also work for a 9 inch block if you start with a 9 1/2 inch square.
ReplyDeleteCurves and templates? Brights and lights? You've combined my two least favorite things with two of my favorite colors! I'll have to give it a shot.
ReplyDeleteJust a clarification on the color choices this month, are the arc and the background supposed to be the same color but just a dark background and a lighter arc?
ReplyDeleteNo, the arcs and background do NOT have to be lighter darker values of the same color. To make it easier to use fabric you might have on hand, just put together nice bright + light combinations
ReplyDeleteSince we now have templates that are already sized, I'm wondering if one could just pin and cut as they would a regular sewing pattern?
ReplyDeleteNevermind - I didn't look carefully. Piece C is really the part that gets cut away from the square. That's why all the talk about squares of fabric. Got it now! : )
ReplyDeleteYou could still pin and cut using thebpaper temp,ates ... Just be sure the placement is as in the directions.
ReplyDeleteI can't get the templates to print out fully using Kristen's links. And those on the real pattern site likewise still need to be enlarged. I don't have access to an enlarger.
DeleteSo, if the big quarter circle measures as shown on the regular pattern page at 3 5/8", the arc as 1 1/4" and the small quarter circle at 3", what are the sizes of the straight edges when those templates are enlarged?
I can work from knowing what the finished sizes are -- either of the printed templates from the pattern page OR from the SEWN sizes of the straight sices of the pices.
Karen